Let me paint you a picture. A client comes to you, asks for a website, and you estimate weeks of work and a $5,000+ invoice. That used to be the reality of agency web design. But in 2026? The game has completely changed — and if you're still building websites the old way, you're leaving serious time and money on the table.
In this article, I'm going to walk you through the AI web design workflow I personally use for client projects — from sitemap to live deployment — using Relume, Figma, Cursor, and Vercel. It's the same process I demonstrated in my latest YouTube video, and by the end, you'll understand exactly how to compress weeks of work into a single focused session.
Why Relume Is a Game-Changer for the AI Web Design Workflow in 2026
Let's clear something up first. A lot of people still think Relume is just a UI kit. And honestly? It used to be. But today it is something much more powerful.
Relume combines AI generation with a massive component library that was built by real designers — not generated by AI. This distinction matters more than you might think. Instead of spitting out random, generic layouts, Relume assembles websites from professionally designed components. The results actually look like agency work, not AI slop. 😅
What really hooked me on Relume is that its workflow mirrors how real design agencies operate:
Sitemap — understand the structure
Wireframes — visualize the pages
Style guides — apply the aesthetics
Design export — push everything to Figma
This isn't just a shortcut. It's the same process I use on almost every client project. When someone asks me to estimate a website, I need to understand scope quickly. Relume lets me generate the sitemap, see the number of pages and sections, and produce a realistic proposal — in minutes, not days.
Step 1: Generate the Sitemap with AI
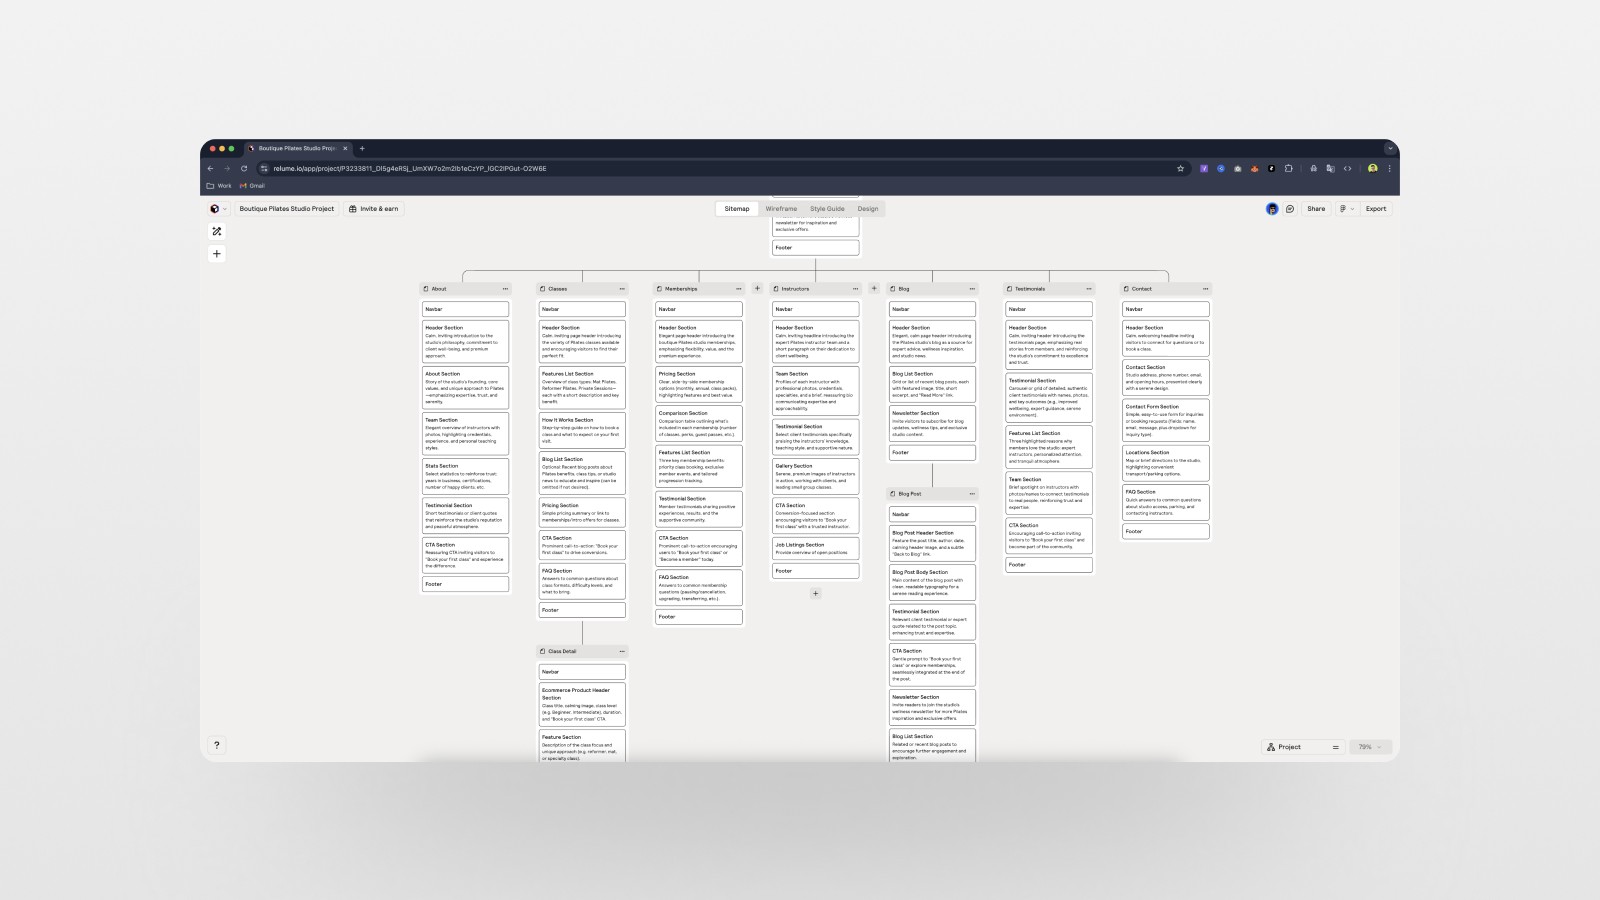
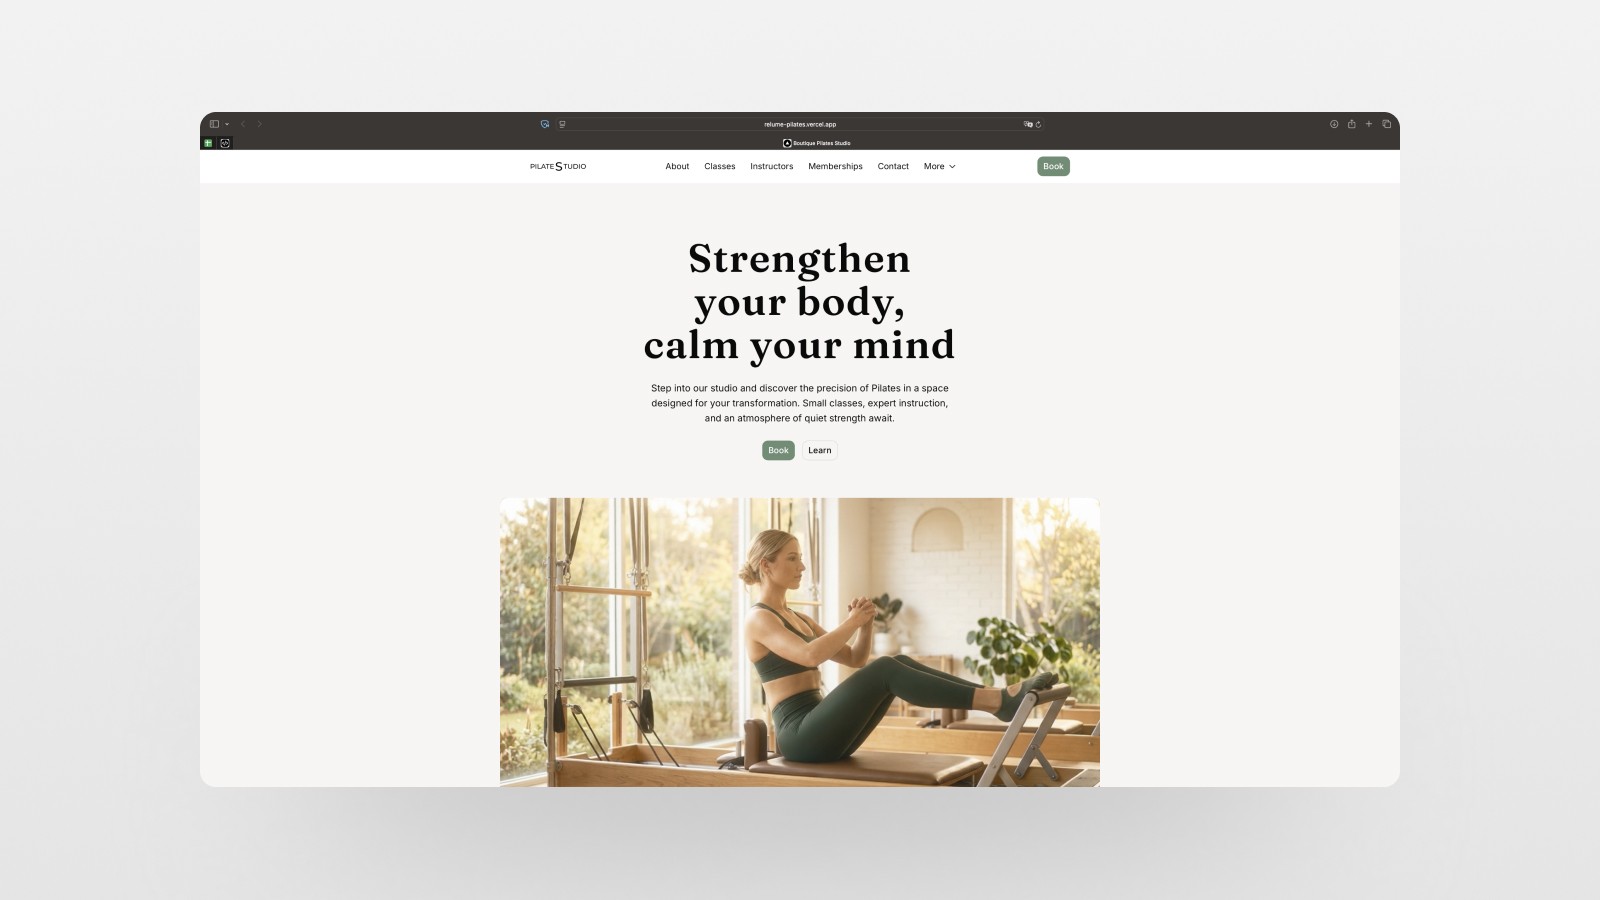
For this demo, I built a website for a boutique Pilates studio — calm, premium, conversion-focused. The prompt I fed into Relume was something like: "Design a calm, premium, conversion-focused website for a boutique Pilates studio that drives intro-class bookings and memberships."
The AI immediately generated a homepage sitemap with all the key sections: hero, features, benefits, testimonials, pricing, gallery. But I needed more than just a homepage, so I bumped the page count up to 10–15 pages and regenerated.
What came back? 🤯 A full multi-page structure including an About page, Classes, Memberships, Instructors, Blog, Testimonials, Contact, a Class Detail page, and a Blog Post template. All in a few seconds.
At this stage, I can already estimate the scope of the project — how many pages, how many sections — and calculate a realistic budget for the client. We're talking 2–3 hours of planning work, done in minutes. That's not hyperbole. That's what happened.
You can also customize the sitemap: reorder sections, delete ones you don't need, add new ones by dragging from the component library. The navigation and footer are marked as global components (green), so they automatically appear on every page. Clean, logical, just like real design work.
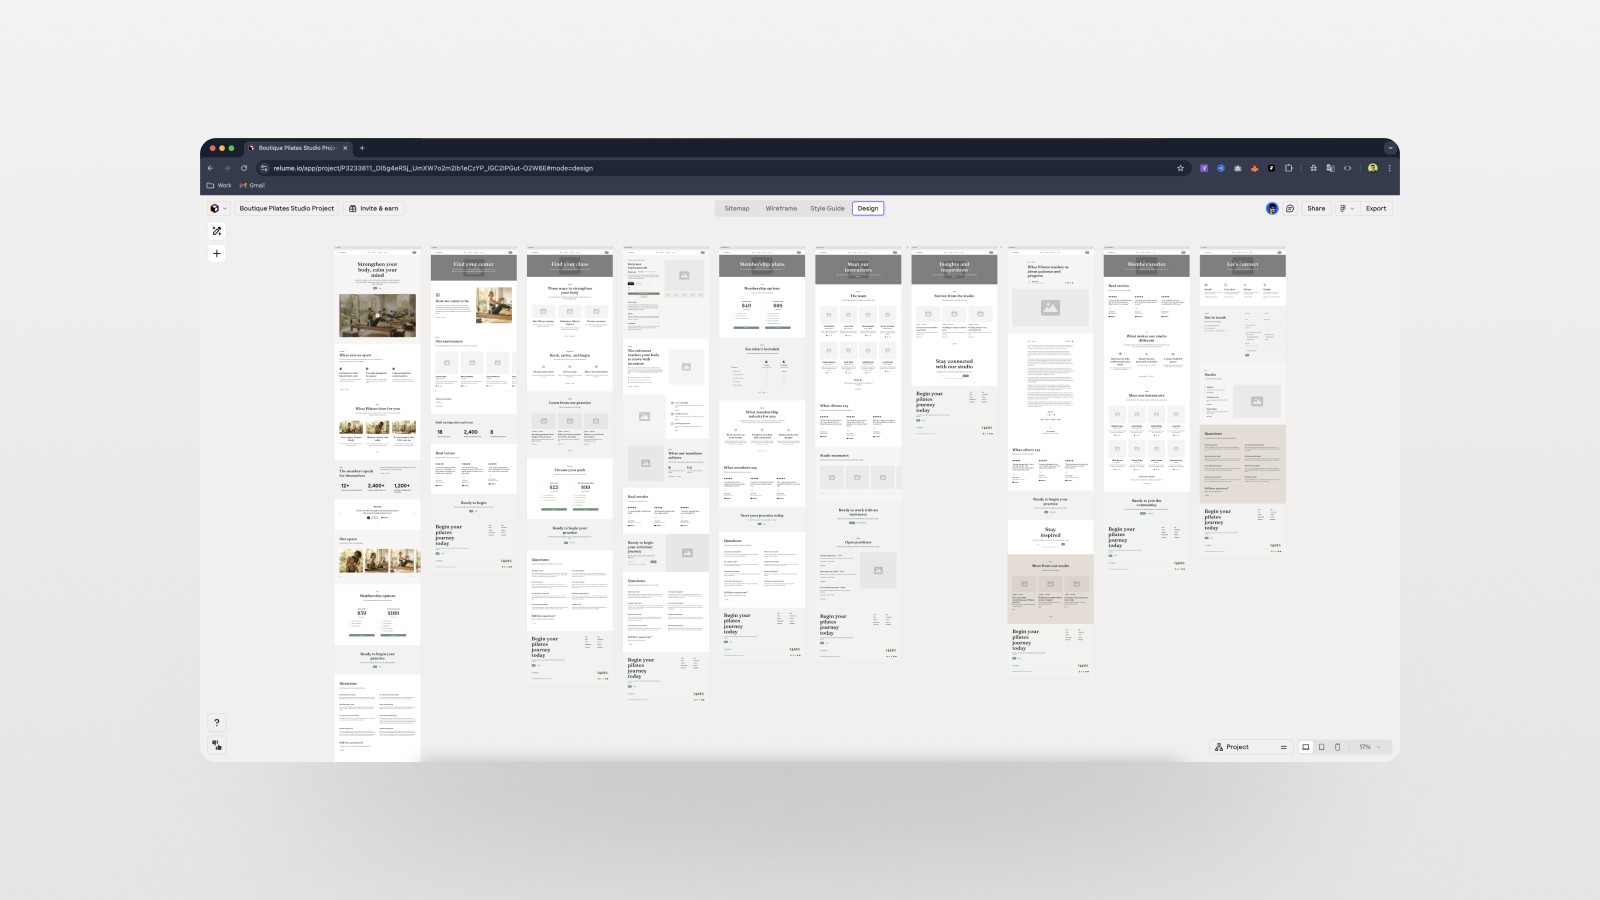
Step 2: Build Wireframes Automatically
Once the sitemap is approved, you hit the Wireframe tab — and that's where the magic really kicks in. Relume uses its component library to build out every single page as a wireframe, automatically.
Every section has placeholder text generated by AI. You can click in and edit the copy directly. You can swap out hero layouts, toggle between image and video backgrounds, filter sections by style — all within the wireframe stage. At this point I can already show the client what their website could look like, before we've spent a single hour on design.
Conservative estimate: the wireframing alone saves 5–6 hours. Maybe more, depending on the complexity of the project. For a 10-page website with custom sections? Easily a day or two of work, compressed into minutes.

Step 3: Create Style Concepts (This Is Where It Gets Fun 🎨)
Now comes the part clients love — the style guide. Relume AI generates design concepts that actually understand the context of your project. For a Pilates studio, it didn't suggest neon pink or aggressive gradients. It gave us calm, natural tones — earthy, premium, serene. Exactly what the prompt asked for.
In the style guide panel, you can:
Swap in your own logo (light and dark mode versions)
Change colors and typography
Upload custom photography or switch placeholders to video
Generate alternative concepts using the "shuffle" mode
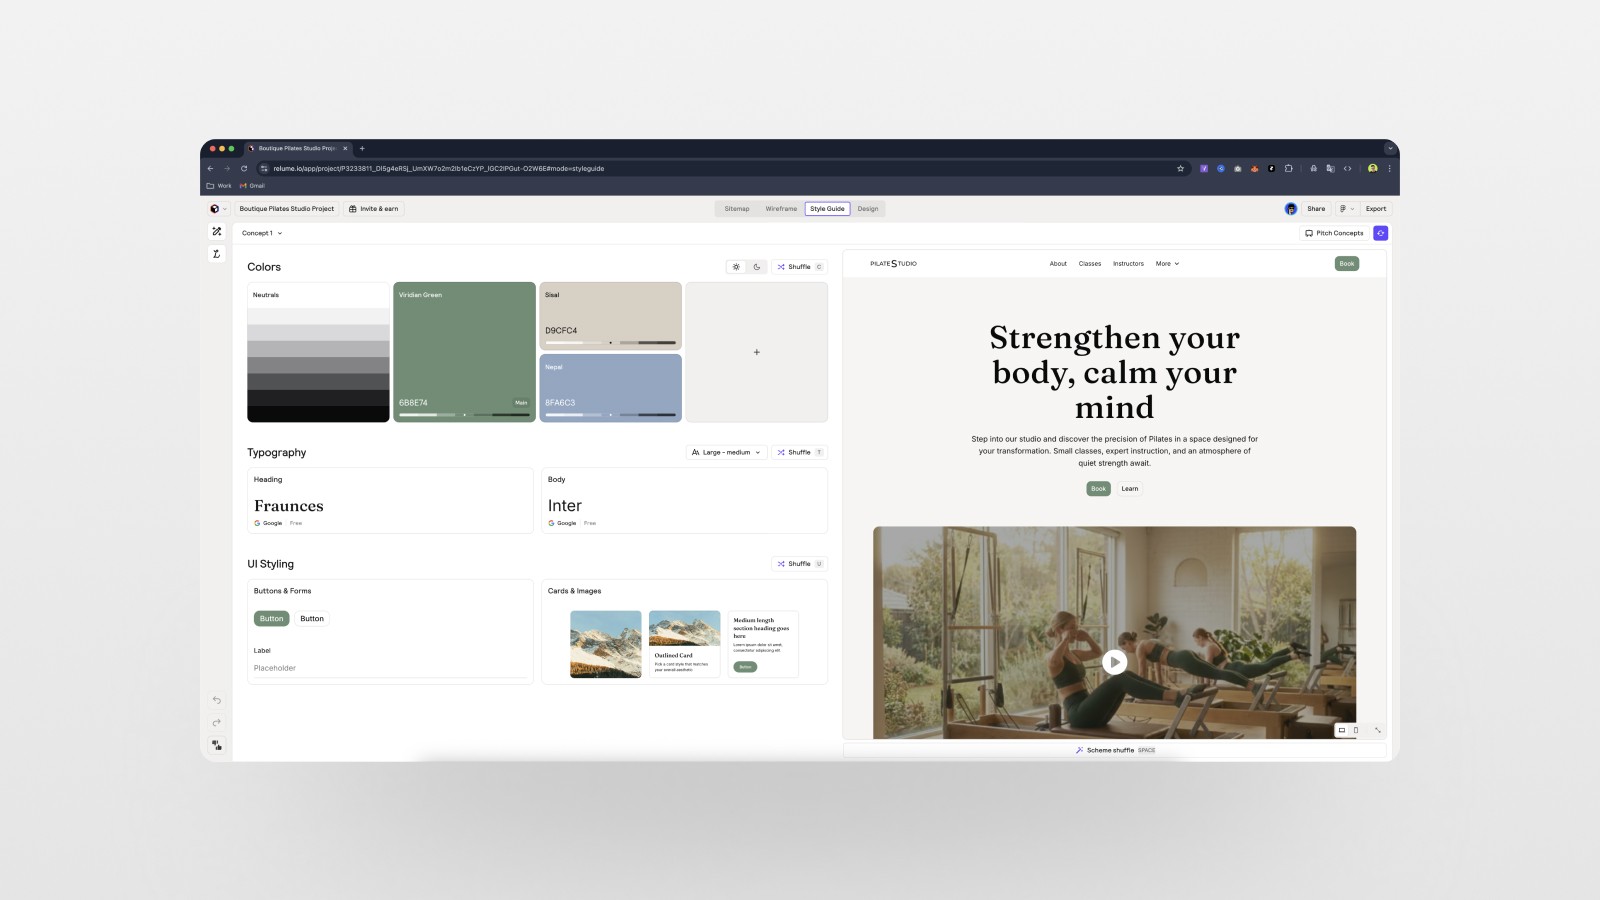
For this project, I created three distinct style concepts: a clean light version, a moody dark mode, and an earthy brown-toned palette. You can present all three to the client and let them choose. This is exactly how I pitch design concepts — polished, professional, fast.
Once the client picks a direction, you click into Design mode. Relume takes the chosen style and applies it consistently across every page of the site. Full design system, applied automatically. What would normally take two to three days of Figma work? Done.
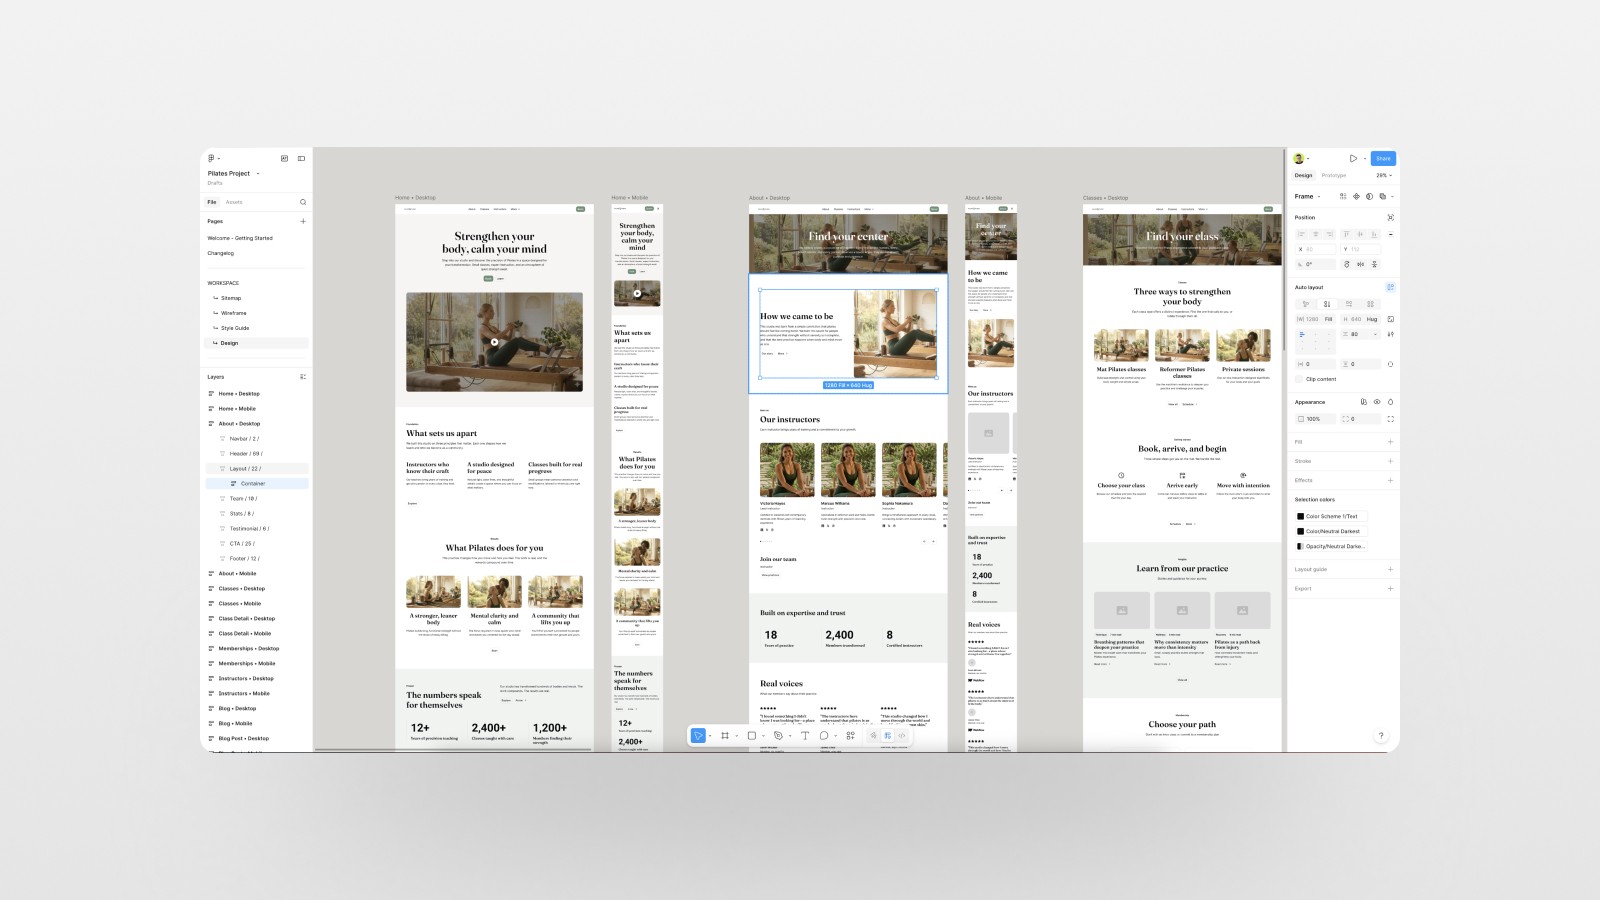
Step 4: Export to Figma — Everything You'd Expect from a Pro Handoff
Here's where the AI web design workflow gets really interesting for freelancers and agencies.
After designing in Relume, I export everything directly to Figma. The export pulls in all the pages — desktop and mobile — with auto layout applied, color variables set up, and a complete style guide page. Every component is properly structured. The file is ready to hand off to a client or developer without any extra cleanup.
Relume estimates that this step alone saves 8 hours of work. Combined with the sitemap and wireframe stages, we're looking at 10–15 hours saved per project. And if you're doing multiple client projects a month? The math gets very interesting very fast. 📌
One thing worth noting: when you export, the Relume Figma kit also gets copied into your project, giving you access to the full component library for future use. This is a solid bonus, especially if you're building your own design system on top of it.
Step 5: Turn the Figma Design Into Code with Cursor
Once the design is in Figma, it's time to build. I use Cursor (an AI-powered code editor) for this step. My stack of choice: React + Next.js, deployed on Vercel.
Here's the workflow:
Open your Figma project in the Figma desktop app (not browser — I've had issues with MCP links not working properly from the browser version).
In Cursor, write a prompt describing what you want built, with breakpoints for desktop and mobile.
Use Cursor's
figma implement designskill mode, then paste in the copy links from your Figma frames — one for desktop, one for mobile.Run it in Agent mode and let Cursor read the Figma file via MCP.
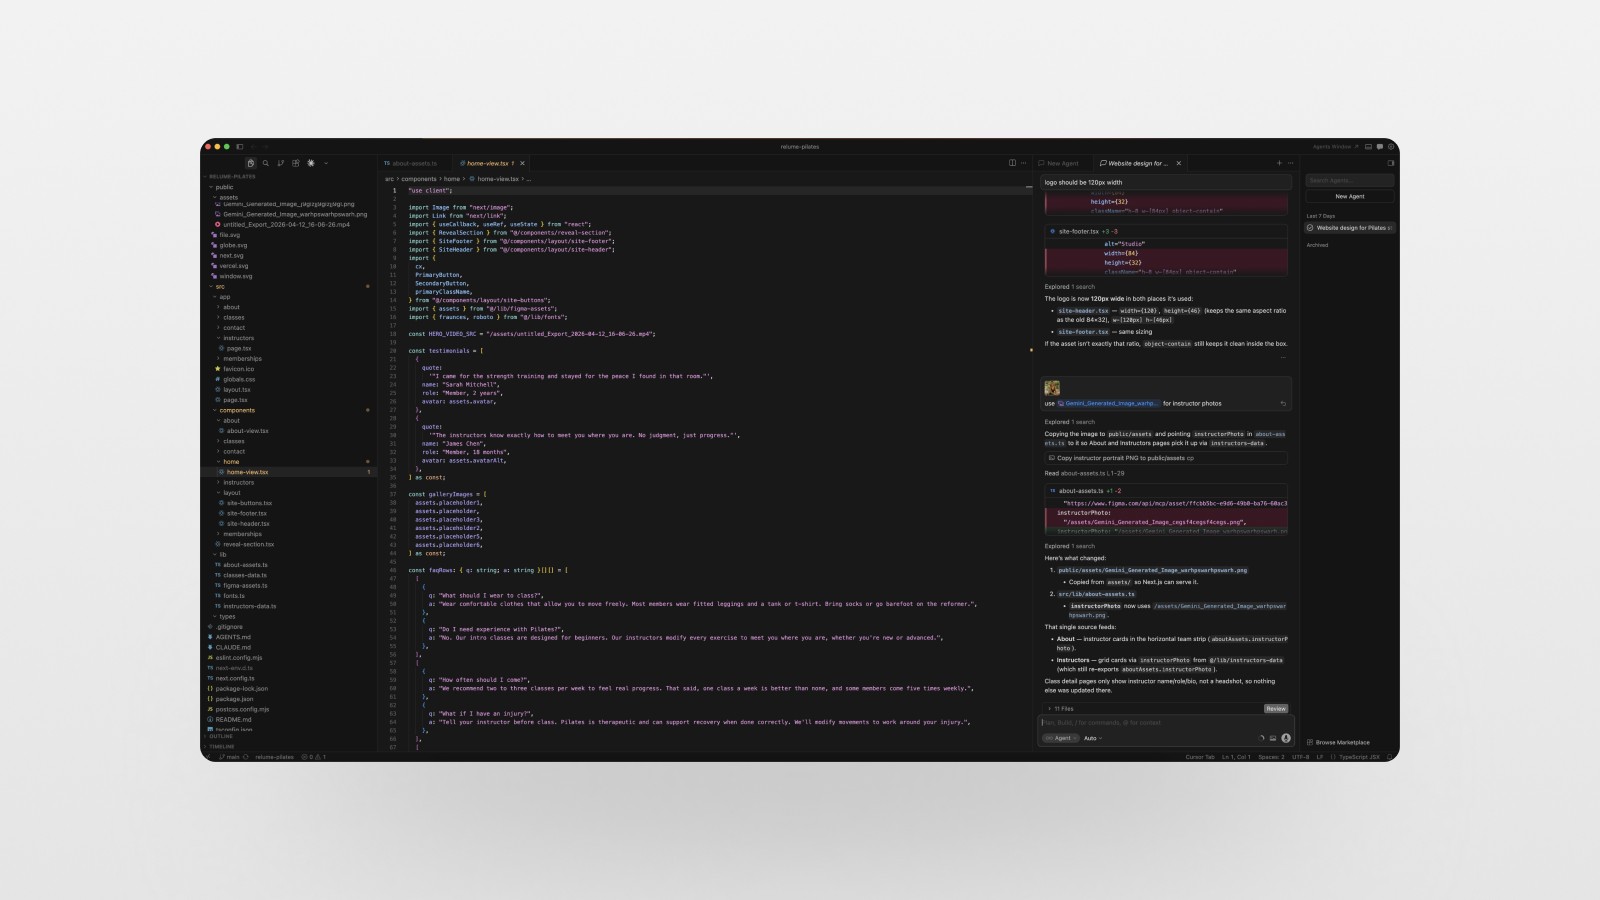
Cursor reads all the variables, captures screenshots of the design via the Figma MCP plugin, and builds out the page with working animations, hover states, and responsive layouts. When it's done, you run npm run dev in your terminal, open localhost, and there it is — your design, in code, looking exactly like what you built in Figma.
One practical tip: download all your images and assets into your project folder. When Figma MCP links images, they reference the Figma file instead of living locally in your project. For production, you want those files in your repo.
Step 6: Deploy Live with Vercel in Minutes
The final step is getting the site live. For a Next.js project, Vercel is the easiest path by far.
The process:
From Cursor, publish your project to a private GitHub repository.
In Vercel, add a new project and import from GitHub.
Click deploy. That's it.
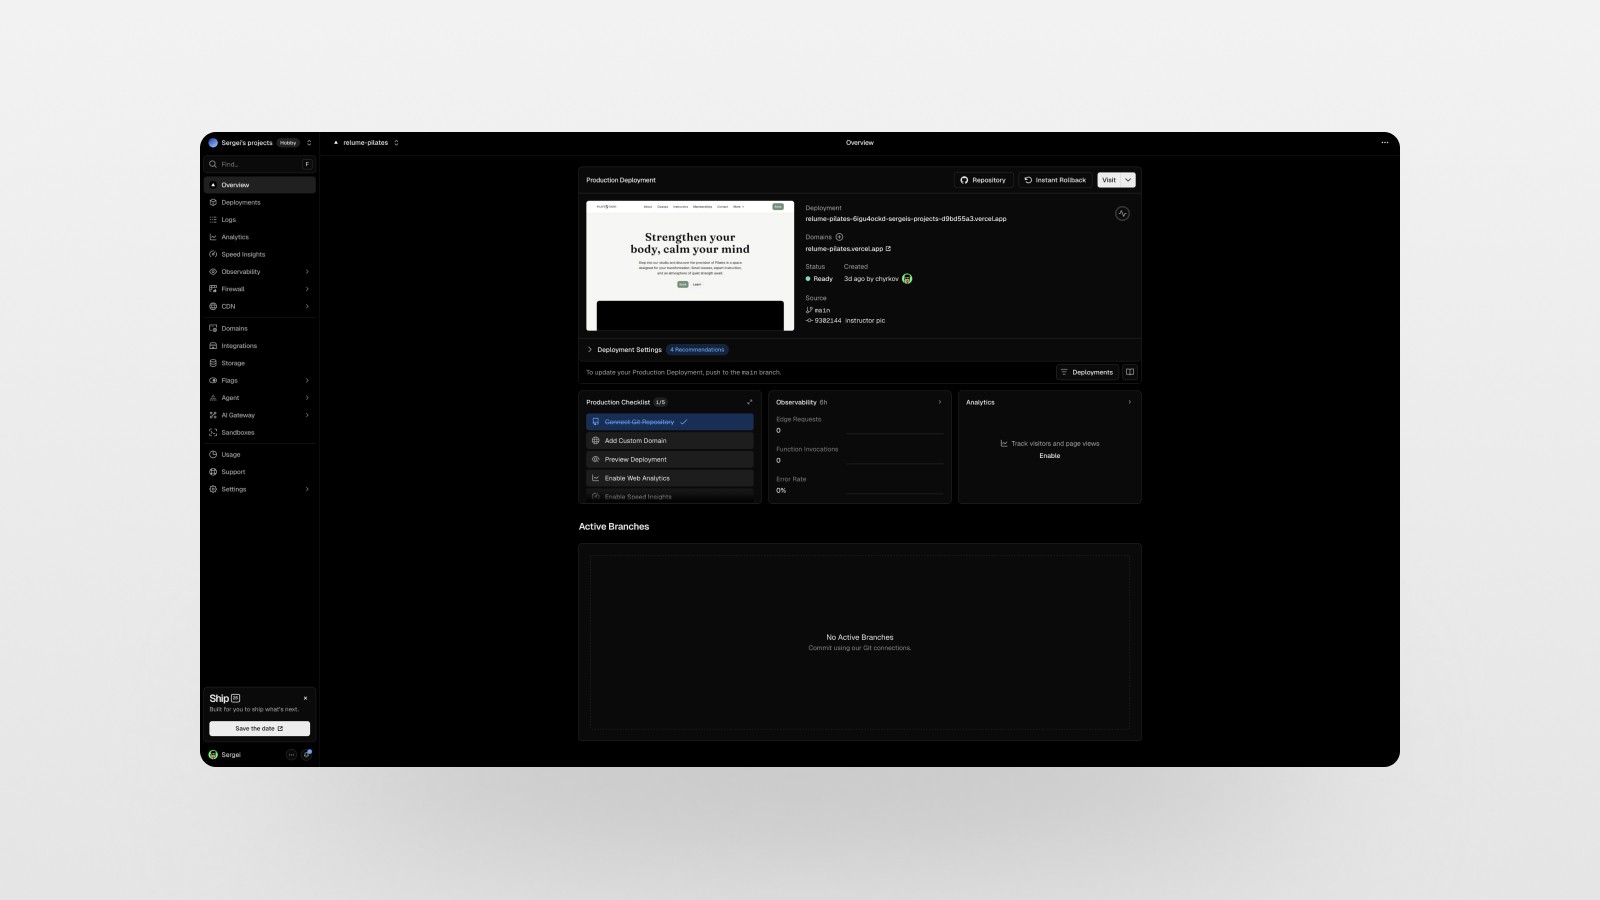
Vercel gives you a free subdomain (yourproject.vercel.app) immediately. When the client approves the project, you connect their custom domain and you're done. Live, professional, deployed — in under 10 minutes.
The Real Value: What This Means for Your Business
Let me be honest with you about why I actually use this workflow 👀.
It's not just about saving time (though saving 10–15 hours per project is obviously huge). It's about what you can do with that time instead.
When I can scope a project in minutes and show a client polished wireframes and design concepts in the same meeting, my close rate on proposals goes way up. When I can go from approved design to live deployment in an afternoon, I can take on more projects, deliver faster, and charge premium rates because my output quality is undeniably agency-level.
This workflow isn't about replacing design expertise — it's about amplifying it. The components are professionally designed. The decisions about layout, copy, and aesthetics still come from you. Relume and Cursor just handle the execution.
If you're a web designer, UX/UI designer, or freelancer who's been hesitant about integrating AI into your workflow, this is the entry point I'd recommend. It's practical, professional, and it produces real results.
Actionable Steps to Get Started Today
Sign up for Relume — There's a 7-day free trial on the Pro plan. You can also follow along with the free tier to get a feel for it.
Start with a simple prompt — Describe your project's purpose, tone, and primary CTA. The more specific, the better the sitemap.
Generate 3 style concepts — Don't just accept the first one. Use shuffle mode and present options to your client.
Export to Figma — Get comfortable with the Relume Figma kit and how variables map across pages.
Try Cursor's Figma MCP integration — Even just building one page end-to-end will show you how fast this can move.
Deploy to Vercel — Connect your GitHub repo and go live. It's genuinely this straightforward.
Conclusion: The Modern AI Web Design Workflow Is Here
The AI web design workflow combining Relume, Figma, Cursor, and Vercel isn't a gimmick or a shortcut that produces mediocre work. It's a genuinely professional pipeline that mirrors how good agencies operate — with AI handling the heavy lifting so you can focus on the creative and strategic decisions that actually matter.
I built an agency-level website in under an hour in my latest video, and the results speak for themselves. If you want to see the full process step by step — including the prompts I used, how the Figma export looks, and the live Cursor build — go watch the video. And if you found this useful, subscribe to the newsletter for more tutorials, tips, and tools for designers and creative freelancers. 🙏
FAQs
Is Relume only for experienced designers?
Can I use Relume without Figma?
Do I need to know how to code to use this workflow?
How much does this stack cost?
Is the code quality good enough for real client projects?