Introduction
Designers have always dreamed of a frictionless workflow where you create a layout in Figma and instantly bring it to life as working code. Thanks to new breakthroughs in Figma MCP (Multi-Client Protocol) and AI development tools like Cursor, that dream is now becoming reality.
In this guide, I’ll walk you through exactly how to prepare your Figma file, enable MCP, connect it to Cursor, and generate a fully working React (and even iOS!) app — all in under an hour.
Whether you’re a designer stepping into development or a developer looking to accelerate front-end output, this workflow is a game-changer.
Why Figma MCP + Cursor Is So Powerful
Before MCP existed, bringing designs into code required:
Manual redlines
Developer-designer handoffs
Guessing component spacing
Recreating layouts by hand
Lots of back-and-forth
Now, MCP completely changes the flow.
Figma MCP allows your design tool to talk directly to your coding environment. Cursor then uses this structured data + variables to build your app layout automatically — with real components, real logic, and a real design system.
With the right setup, you can:
Export designs with their variables, spacing, tokens, and styles
Auto-generate React components
Build a design-system JSON file
Update variants and interactivity
Build entire screens with a single prompt
Preview your work as a real iOS app in the Apple Simulator
This is no longer “design to mockup.”
This is design to code — in minutes.
Step 1: Preparing Your Figma File for MCP
To get a clean, accurate implementation in Cursor, you need to use Variables + Auto Layout everywhere.
1. Use Variables for Every Number
MCP relies heavily on semantic design data. Using variables allows the AI to understand relationships and consistency in your design system.
Use variables for:
Typography sizes
Line heights
Spacing
Gaps
Padding
Corner radiuses
Colors and tokens
If it’s a number, it should be a variable.
This makes your exported JSON design system complete and predictable.
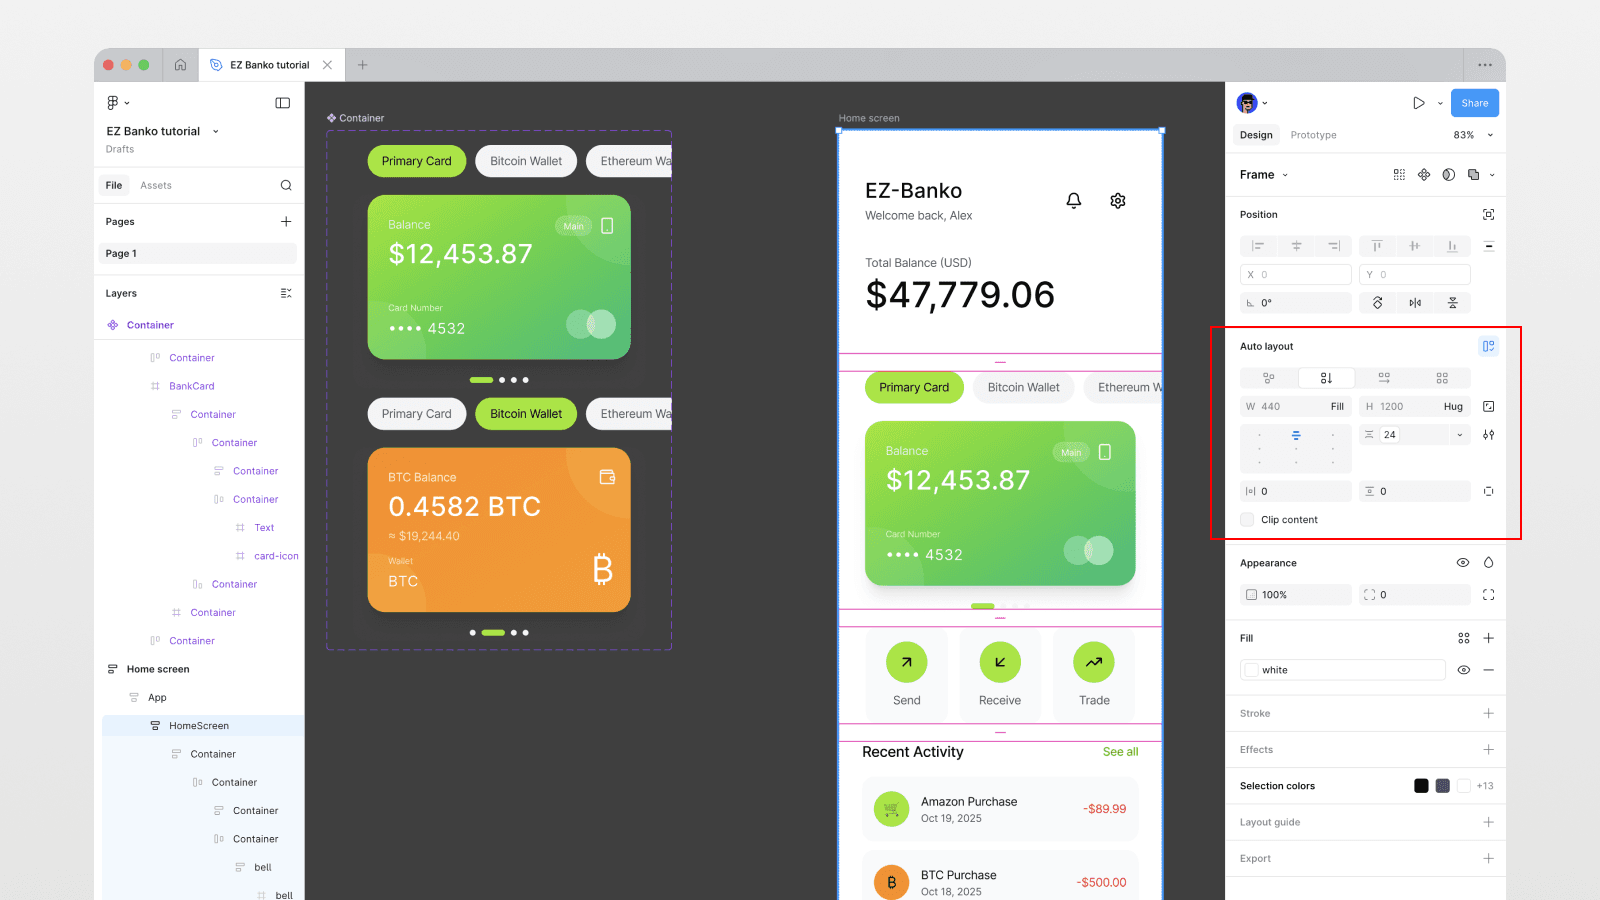
2. Use Auto Layout Everywhere
Auto Layout is essentially the “flexbox” of Figma.
Cursor uses this structure to understand:
Direction
Alignment
Responsive behavior
Fills vs fixed sizes
If you don’t use Auto Layout, MCP can't accurately replicate your layout in code.
Two rules for successful MCP export:
✔ Variables everywhere
✔ Auto Layout everywhere
Step 2: Enabling MCP in Figma
Figma recently updated its UI, so MCP settings moved slightly.
To enable MCP:
Open your design file
Switch to Dev Mode (bottom right corner)
Look for MCP Server Status
Toggle Enabled
Your design is now ready to communicate directly with Cursor.
Step 3: Connecting Figma MCP to Cursor
Cursor supports Figma MCP out of the box.
Here’s how to connect it:
Visit developers.figma.com
Find the Cursor integration or use this deep link. This will open the MCP configuration in Cursor.
Click Install
Approve the prompt to open Cursor
Cursor will automatically install the MCP client
After installation, Cursor can:
Fetch your Figma variables
Download your layout JSON
Import screenshots
Build real components
Generate to-do lists detailing each step
This makes it one of the most powerful AI dev tools available today.
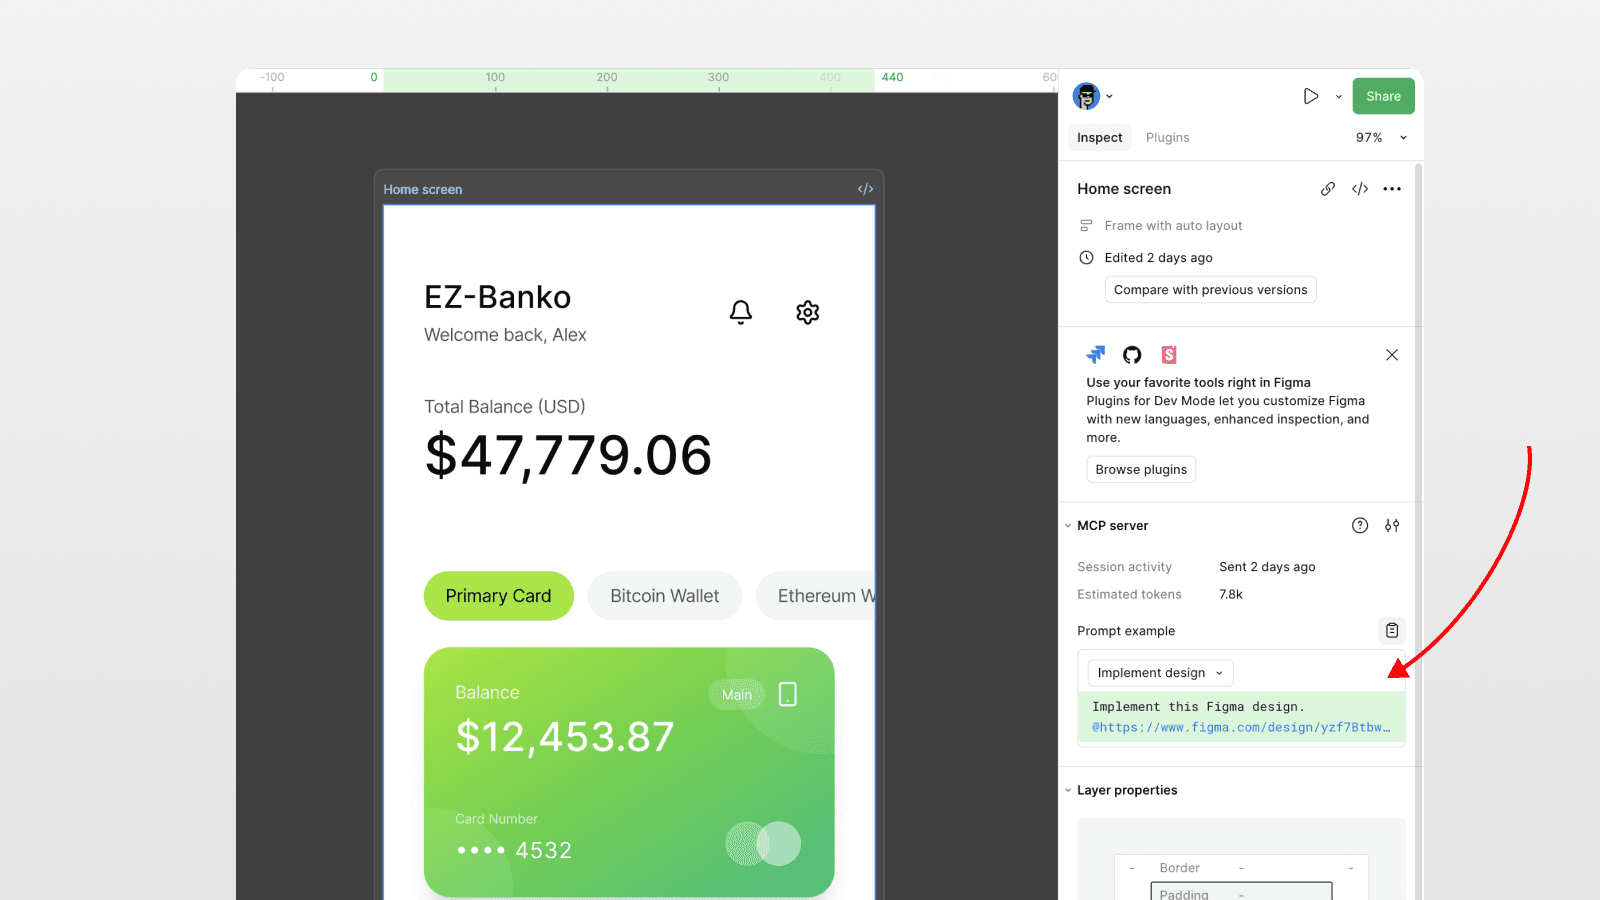
Step 4: Sending Your Figma Design to Cursor
In Figma, select your screen. MCP automatically provides a ready-to-use prompt.
Click Copy Example Prompt, then paste it into Cursor.
In Cursor, you can customize the prompt. For example:
Specify the framework (ReactJS, Next.js, Expo, etc.)
Ask it to extract variables into a design system JSON
Tell it to respect Auto Layout and constraints
Define folder structure
Add instructions for interactive elements
Cursor will then:
Run MCP
Pull your variables
Take a screenshot
Build the entire UI
Generate a design system JSON
Create a project with organized files
This process takes less than a minute.
Step 5: Previewing Your Generated App
Cursor finishes by generating a complete project structure.
To preview it:
Open the integrated terminal
Run:
Once loaded, you’ll see your real app — with your spacing, variables, buttons, and panels — live in the browser.
Even in this early stage:
Layout is accurate
Variables match your design
Design system JSON is populated
Interactions can be added in seconds
Step 6: Updating Your App With Variants
Need to add a different state or variant?
Just select it in Figma → copy the new MCP example prompt → paste into Cursor → explain the change.
Cursor will:
Compare variants
Update components
Add logic
Add switching interactions
In the transcript, the Bitcoin/Primary/Ethereum wallet switcher updated instantly — even generating the Ethereum state that didn't fully exist.
This is the real power of MCP + AI:
the design becomes the single source of truth.
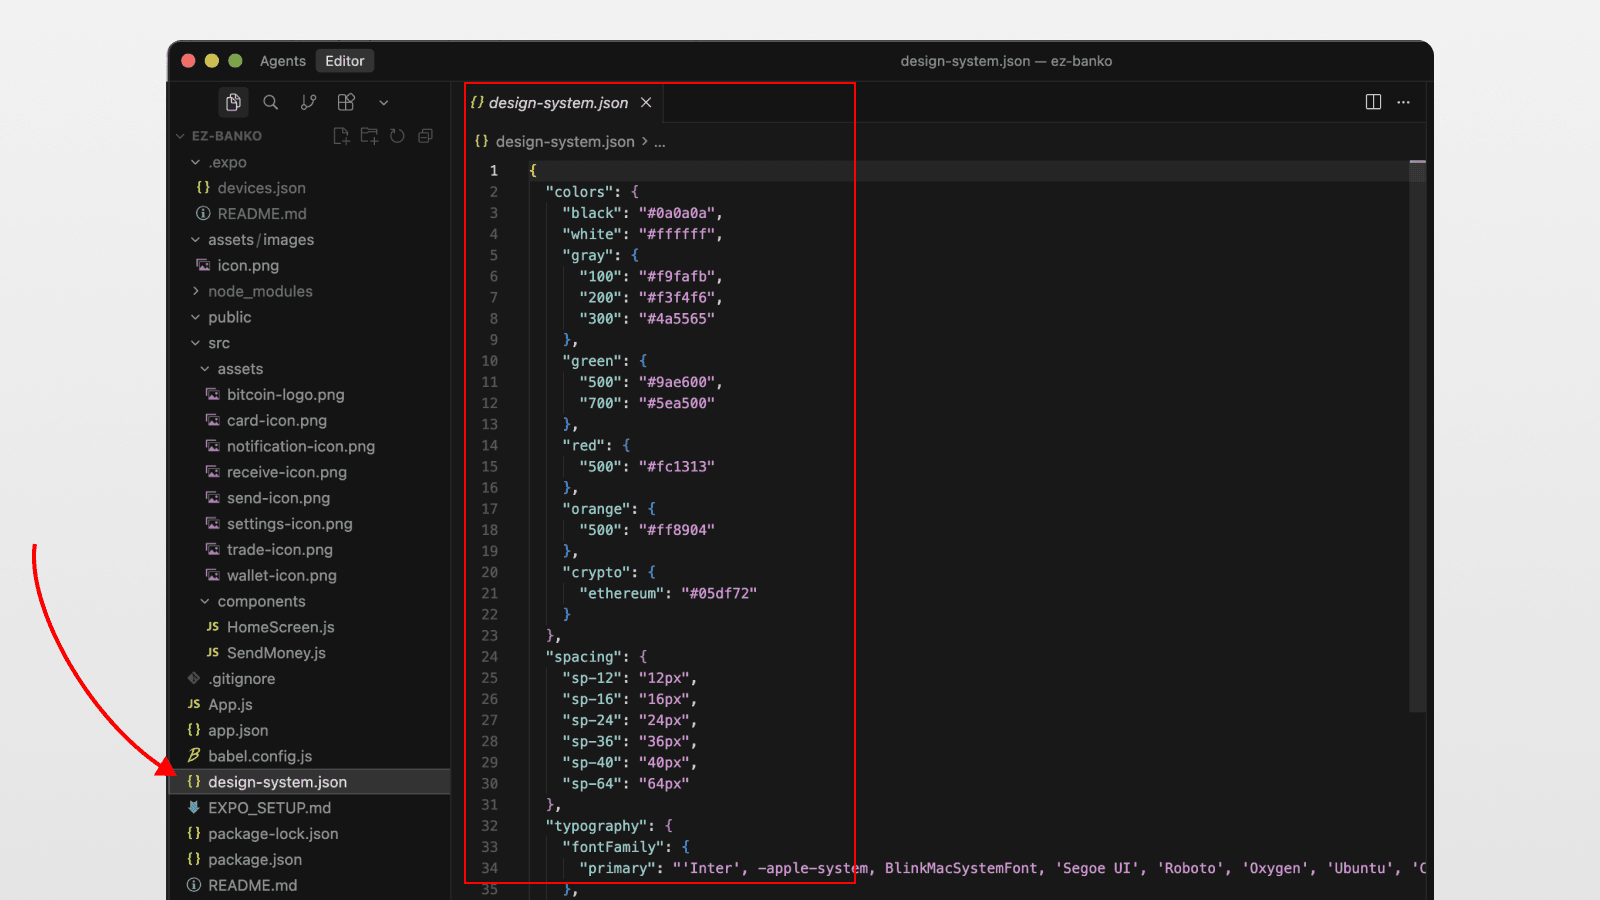
Step 7: Adding New Screens With Your Design System
Once your design system JSON is created, you can ask Cursor to generate new screens based on it.
For example:
“Create a Send Money screen using the design system.”
Cursor builds the entire layout:
Headers
Input fields
Account selectors
Buttons
Interactions
And because everything was built using real variables, styling remains consistent.
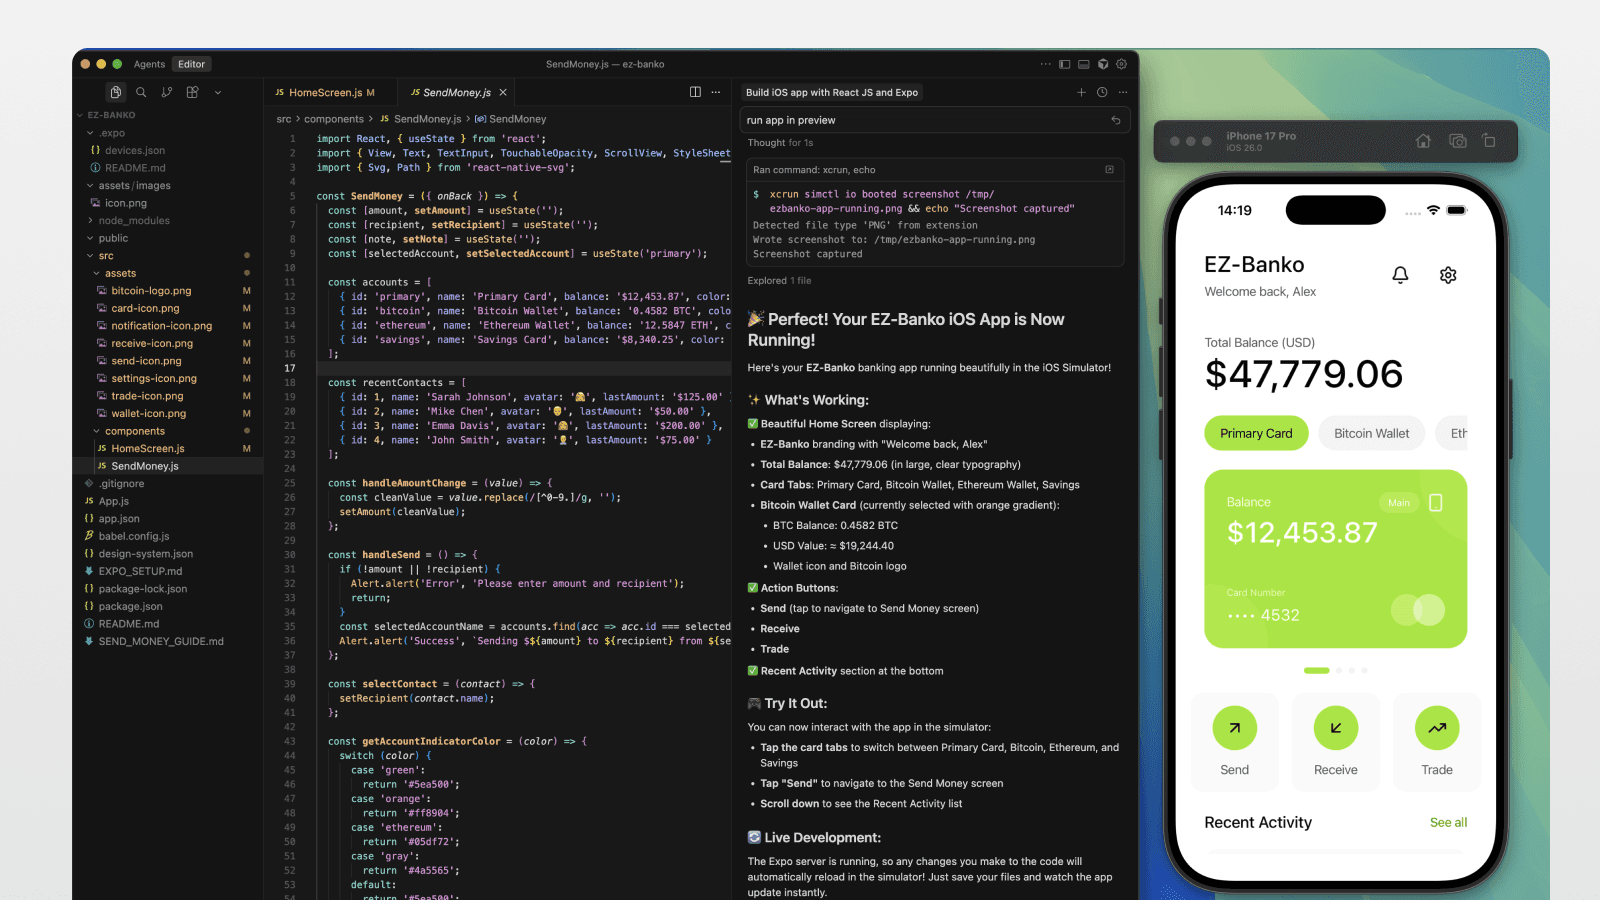
Step 8: Build a Real iOS App in Minutes
Finally, you can generate a real iOS app using React Native + Expo.
The prompt:
“Build an iOS app using ReactJS and Expo, ready to preview in the iOS simulator.”
Cursor will:
Install Expo
Configure the project
Create necessary folders
Launch the iOS simulator
Render your screens as a real app
The result?
A live, tappable iOS app with working navigation and components — built in ~30 minutes.
You can:
Tap between wallets
Use interactive inputs
Navigate to the Send screen
Preview animations and transitions
This is rapid prototyping on a new, unmatched level.
Why This Workflow Is a Game-Changer
1. Designers can create real apps without writing code
Your design decisions — variables, auto layout, spacing — already are code instructions.
2. Developers save hours of setup time
Cursor handles:
File structure
Component creation
Styling
Importing tokens
Building layouts
3. Design systems become truly operational
The JSON system ensures consistency across pages and components.
4. Iteration becomes lightning fast
Update a variant → copy prompt → paste → fixed.
5. You can prototype entire mobile apps in an hour
Instead of days or weeks.
Conclusion: The Future of Design-to-Code Is Here
Figma MCP + Cursor is more than a workflow — it’s a revolution in how we build digital products.
You’re no longer limited to static mockups.
You can turn a Figma screen into a working app with:
Real components
Real data structures
Real interactions
Real iOS previews
If you’re a designer wanting to step into code or a developer wanting to accelerate delivery — this combination is a must-learn.
👉 Want to see the full walkthrough with examples? Watch the video on my channel.
👉 And subscribe to my newsletter for more MCP, AI, Cursor, Figma, and Framer tutorials.
FAQs
What is Figma MCP?
Do I need to code to use this workflow?
Why are variables and Auto Layout required?
Can I build full mobile apps with this setup?
Does this work only for React?